Other than YouTubers, nobody intenionally "drops" a bike. But, it is unrealistic to think that you will NEVER drop you bike or that it will NEVER fall over---no matter how careful and skilled you are.
So, adding crash protection seems prudent.
The best and most well known product to protect the hand control levers comes from Barkbusters a company in Australia. Essentially, a thick aluminum bar frame attaches to the handlebar and surrounds the control levers. There are universal mounts--I chose the one designed for the G310 available from T-Rex Racing. The added benefit is they protect your hand from tree branches if riding in the woods, or from other motorcycle handlebars, and/or car mirrors if splitting lanes or riding/driving close.
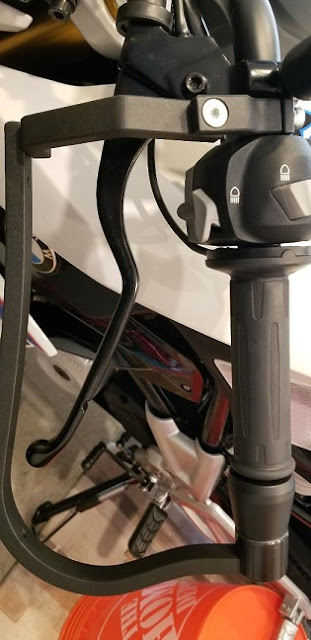
The next addition was engine "crash bars" added to the frame to protect the engine and especially the fragile radiator.

These bars are well engineered and attach to the bike's frame using existing engine mounting tabs and a custom made split block type frame bracket. Very stout.
There are several YouTube videos showing the effectiveness of the engine crash guards and hand guards protecting the front half of the bike. Protecting the rear half is more problematic as there is not real truly "robust" frame behind the monoshock.
One vulnerable area, specifically the rear axle itself can be protected with simple crash "buttons" that attach using a long bolt thru the hollow axle. Again, T-Rex Racing provides good ones. (The picture also shows T-Rex Racing jack spools which I have not installed as the center stand causes the rear tire to be lifted.)

I was still not satisfied with protection of the rear of the bike---for two reasons. First to simply reduce the impact forces on the swing arm which the axle crash buttons do not do. And, without a rear crash bar, most likely you will damage your shifting lever or rear brake lever. Second, if the bike was dropped during cornering or in anticipation of a collision, I wanted a way to reduce the weight that would be in contact with the rider sandwiched between the road and the bike.
On the right side, the muffler provides sufficient protection, but the left side has nothing.
My first thought was to make use of the passenger's footpeg. I fabricated a bracket to keep the peg from folding up. I made it weak enough (from soft 0.40" aluminum) to hopefully crush if encountering a force strong enough to break the aluminum die cast side bracket that the peg is mounted to. I also pressed on a rubber tube (hose) and vinyl button to "cushion" any impact and keep the relatively sharp peg from digging into pavement.

The best solution for rear protection seemed to be from something attached to the frame behind the seat. Watching an installation video on a Shad Top Case, it occured to me that a large (wide) top case (around 24" wide) would provide the protection I wanted. But, I really did not want the height of a top case which makes it harder to swing your leg over when mounting the bike.
The Shad 39 in the video was 20" wide. The Shad 48 is 24" wide.


Both cases use the same mounting bracket on a G310R. I purchased the bracket and installed it as shown in the video.
I analyzed the geometry of the bike and concluded that the 24" width provided by the Shad 48 was perfect to protect rider and bike. But again, a large top case was not my desired solution. All I need for storage is a back pack attached to the bike for carrying a bottle of water and rain gear or clothing.
So I designed a crash bar that would mount to the Shad mounting bracket. The 1/1/4" OD exhaust tubing "U" provided the almost perfect "crash surface". Rounded and thin enough to deform in a violent crash, but strong enough to hold the bike up if dropped. (From Summit Racing) I attached the tubes using two "beam" structures fabricated from 3/4" square tubing and 1" u channel from Home Depot that together provided four contact points to the 1.050" ID of the tubing. So the tubes slid over the beams and the beams are attached to the Shad mounting bracket rear plate.
I considered welding everything together, but decided that 8mm bolts would do fine. I did silver solder the exposed parts of the "beam" together.
Here are pics---the first the Shad mounting bracket. You can see that the plate is mounted to a bracket supplied by Shad that bolts to the bike frame at the rear of the seat. In addition there are two solid steel arms that go forward and mount to the same location where the rear sear handles mount. Then, the crash bar with back pack for mock up. Finally, the painted parts in place reading to ride.


The rear crash guard can be used to tie down a back pack or duffle bag. It is very strong up/down and fore/aft. There is slight bending when a twisting torque is applied, but the movement is mostly in the bike frame itself--the Shad mounting bracket is as rigid as needed. As mentioned, the design assumes that some energy would be absorbed by deformation of the thin wall exhaust u tubes in a violent crash.
The bars in combination should allow the bike to slide away from and not trap the rider if dropped when riding.


No comments:
Post a Comment